Updated on November 30, 2023
KEY TAKEAWAYS
- Google Pixel 8’s Audio Magic Eraser: The guide introduces a groundbreaking feature, the Audio Magic Eraser, which allows users to effortlessly eliminate unwanted background noise and enhance audio quality in videos.
- Simple Activation Steps: The guide provides straightforward steps to unleash the power of Audio Magic Eraser on Google Pixel 8, starting from accessing the Edit Menu in Google Photos to activating the Audio Eraser tool.
- Manual and Automatic Adjustment Options: Users can manually adjust volume levels of different sound elements recognized by Google’s AI, such as noise, speech, and wind, using an intuitive slider. Alternatively, they can opt for automatic adjustments by tapping the Auto button.
- Preview and Save Your Refined Video: Before finalizing edits, users can preview the edited video to ensure satisfaction. The guide instructs users to play the video and save a copy of the refined version, emphasizing the importance of previewing the changes.
- Transformation Showcase: The guide includes a before-and-after video demonstration, showcasing the transformative capabilities of Audio Magic Eraser. Despite potential rough spots in the edit, the significant improvement in audio clarity, particularly in scenarios like a noisy train ride, highlights the tool’s effectiveness.
Welcome to the future of video editing with Google Pixel 8’s groundbreaking feature — the Audio Magic Eraser. Imagine effortlessly transforming your videos by eliminating unwanted background noise and enhancing the audio quality.
In this comprehensive guide, we’ll walk you through the steps to harness the power of Audio Magic Eraser.
Whether you’re a Pixel 8 owner or looking to surprise a friend with this incredible tool, get ready to dive into the world of AI-powered audio wizardry.
How to Unleash Audio Magic Eraser on Google Pixel
If you’re eager to enhance the audio quality of your videos using the Pixel 8’s Audio Magic Eraser, follow these simple steps:
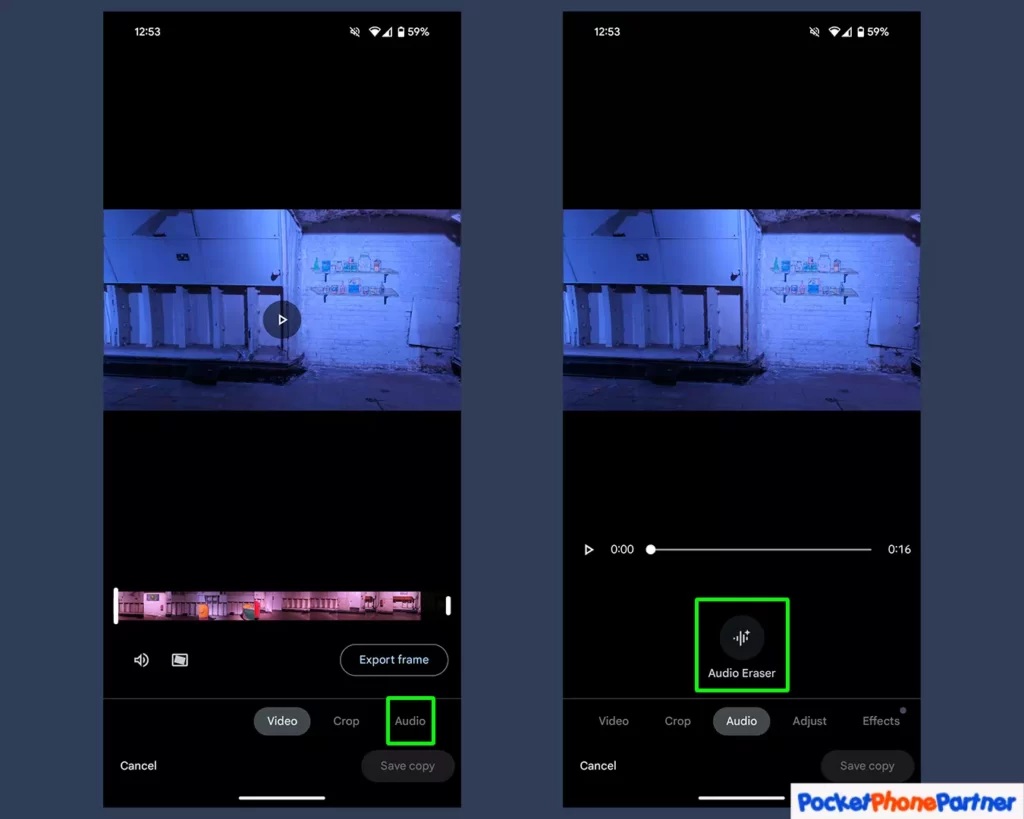
Access the Edit Menu in Google Photos

Accessing the Edit Menu in Google Photos is a straightforward process that allows users to enhance and customize their videos effortlessly. To initiate the editing process, users start by opening the Google Photos app and selecting the specific video they want to edit.
This can be done by navigating through the app’s interface and locating the desired video in the user’s library.
Once the desired video is selected, the next step involves tapping on the Edit button, conveniently positioned at the bottom center of the screen. This action opens up a range of editing options, providing users with the tools to enhance the visual appeal and overall quality of their videos.
The Edit Menu encompasses a variety of features designed to cater to different editing needs, offering users a versatile set of tools to transform their videos according to their preferences.
Key Features and Highlights
| User-Friendly Interface▾ |
| • Google Photos maintains a user-friendly interface, making it easy for users to navigate through their video library and access the editing features effortlessly. |
| Edit Button Accessibility▾ |
| • The Edit button is strategically placed at the bottom center of the screen, ensuring users can quickly initiate the editing process with a simple tap. |
| Diverse Editing Options▾ |
| • The Edit Menu in Google Photos offers a diverse range of editing options, including tools for adjusting brightness, contrast, saturation, and more. Users can explore various enhancements to refine their videos. |
| Real-time Preview▾ |
| • Users can experience real-time previews of their edits, allowing them to make instant adjustments and observe the impact on the video's appearance before finalizing changes. |
| Non-Destructive Editing▾ |
| • Google Photos allows for non-destructive editing, ensuring that the original video remains unchanged. Users can experiment with different edits without worrying about losing the original footage. |
| Efficient Editing Workflow▾ |
| • The streamlined editing workflow in Google Photos enables users to quickly apply edits and enhancements without unnecessary complications, making the editing process efficient and enjoyable. |
| Auto-Enhancement Features▾ |
| • For users who prefer a quick and automated approach, Google Photos includes auto-enhancement features that analyze the video and apply improvements automatically for a polished look. |
In summary, accessing the Edit Menu in Google Photos offers a seamless experience, empowering users with a range of editing tools and features to elevate the quality of their videos.
The user-friendly interface, strategic button placement, and diverse editing options contribute to a convenient and efficient editing process.
Activate the Audio Eraser Tool

Activating the Audio Eraser Tool in the Edit Menu of Google Photos is a specific and valuable feature that allows users to control the audio aspect of their videos with precision. To access this tool, users navigate to the Edit menu after selecting their desired video within the Google Photos app.
Once in the Edit menu, attention is directed to the bottom right of the screen, where the Audio header is prominently positioned.
To engage the Audio Eraser Tool, users simply need to locate and select the dedicated Audio Eraser button, which is prominently displayed below the video. This action initiates a range of options and controls specifically designed for managing the audio elements of the selected video.
Whether users want to eliminate background noise, adjust audio levels, or completely remove specific audio segments, the Audio Eraser Tool provides the functionality needed to achieve these precise edits.
Key Features and Highlights
| Specialized Audio Controls▾ |
| • The Audio Eraser Tool offers specialized controls for managing the audio components of a video, providing users with the ability to fine-tune sound elements. |
| Strategic Placement in Edit Menu▾ |
| • The Audio Eraser Tool is conveniently placed within the Edit menu, ensuring users can seamlessly transition to audio editing without navigating through complex menus. |
| Intuitive User Interface▾ |
| • Google Photos maintains an intuitive user interface for the Audio Eraser Tool, making it easy for users to grasp and utilize the various audio editing features. |
| Real-time Audio Preview▾ |
| • Users can experience real-time previews of their audio edits, allowing them to adjust settings and instantly hear the impact on the video's sound quality. |
| Precise Audio Segment Removal▾ |
| • The tool allows users to precisely remove unwanted audio segments, offering control over the final audio output of the video. |
| Background Noise Elimination▾ |
| • With the Audio Eraser Tool, users can effectively eliminate background noise or unwanted audio disturbances, ensuring a cleaner and more polished audio experience. |
| Dynamic Audio Adjustments▾ |
| • Users can make dynamic adjustments to audio levels, ensuring that the sound complements the visual content of the video seamlessly. |
In summary, the activation of the Audio Eraser Tool within the Edit menu of Google Photos provides users with a powerful set of audio editing features.
The strategic placement of the Audio Eraser button, coupled with its intuitive interface and specialized controls, empowers users to precisely manage and enhance the audio aspects of their videos.
The real-time preview and the ability to eliminate background noise contribute to a comprehensive audio editing experience within the Google Photos app.
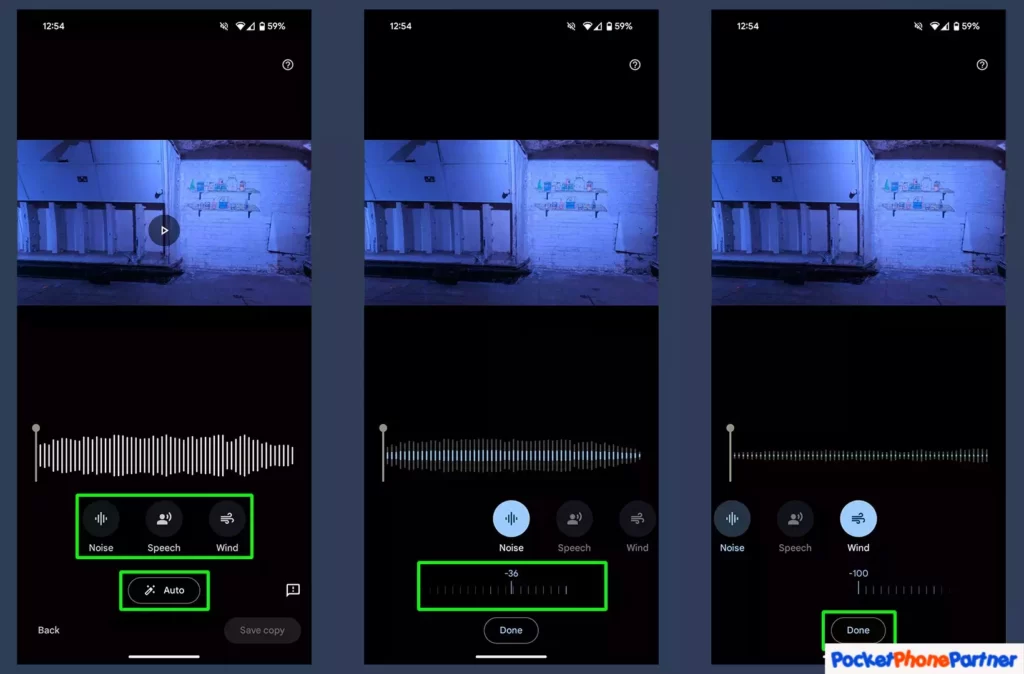
Manual or Automatic Adjustments

The versatility of audio editing in Google Photos extends to the user’s preference for manual or automatic adjustments. This feature allows users to have a hands-on experience in fine-tuning specific sound elements like noise, speech, and wind, recognized by Google’s AI within the video.
Users can take control of the audio dynamics by manually adjusting the volume levels of these elements through an intuitive slider. For those seeking a more automated approach, Google Photos offers a time-saving option—users can let the AI work its magic by simply tapping the Auto button.
When delving into manual adjustments, users can pinpoint and modify the volume levels of distinct sound elements, tailoring the audio to suit their creative vision. The slider interface makes this process intuitive and accessible, allowing users to experiment with different audio balances until they achieve the desired result.
On the other hand, the Auto button provides a quick and efficient solution, leveraging Google’s advanced AI to automatically analyze and enhance the audio elements for optimal quality.
Key Features and Highlights
| Manual Volume Adjustment▾ |
| • Users have the flexibility to manually adjust the volume levels of specific sound elements such as noise, speech, and wind, tailoring the audio to their preferences. |
| Intuitive Slider Interface▾ |
| • The slider interface makes manual adjustments straightforward, enabling users to precisely control the volume levels of different sound elements with ease. |
| Identification of Sound Elements▾ |
| • Google's AI recognizes and categorizes distinct sound elements within the video, allowing users to target and modify specific aspects of the audio. |
| Automated Enhancement with Auto Button▾ |
| • The Auto button offers an automated solution, leveraging Google's AI capabilities to analyze and enhance the overall audio quality without manual intervention. |
| Time-Saving Option▾ |
| • The Auto button provides a quick and efficient way to enhance audio quality, making it a time-saving option for users who prefer a hands-off approach. |
| Creative Control▾ |
| • Whether opting for manual adjustments or automatic enhancements, users retain creative control over the audio aspect of their videos, ensuring a personalized and polished final result. |
| Adaptive AI Technology▾ |
| • The AI technology employed by Google Photos adapts to the unique characteristics of each video, making automated adjustments that enhance the audio quality based on the specific sound elements present. |
In summary, the Manual or Automatic Adjustments feature in Google Photos provides users with a spectrum of choices for audio enhancement. The intuitive manual adjustments through the slider interface and the time-saving Auto button, driven by advanced AI technology, empower users to customize the audio experience of their videos according to their preferences and creative vision.
Preview and Save Your Refined Video

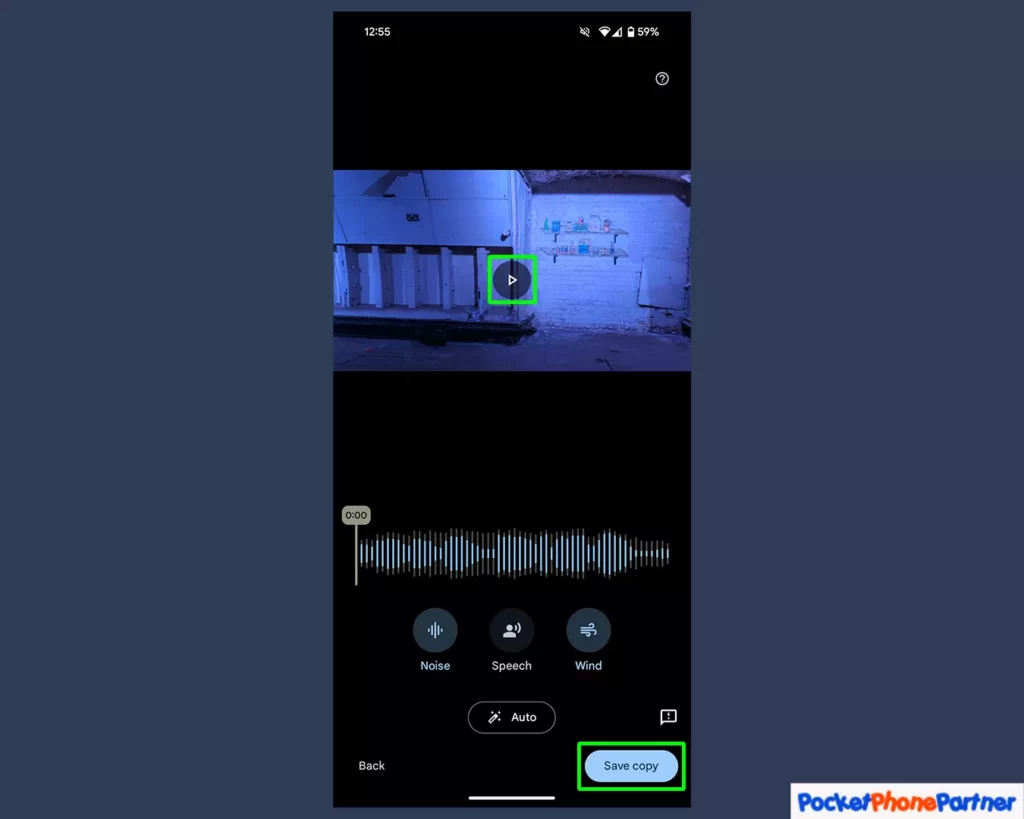
After completing the desired edits using the various tools and features available in the Google Photos app, users can take advantage of the Preview and Save functionality to ensure their video meets their expectations before finalizing the changes.
This step allows users to experience a real-time preview of the refined video by tapping the play button within the preview window. This ensures that any adjustments made, whether to the visual or audio elements, can be reviewed in context before saving the changes.
The preview window provides users with an opportunity to assess the overall impact of their edits, ensuring that the video aligns with their creative vision. It serves as a valuable quality check, allowing users to catch any potential issues or make additional adjustments if necessary.
This iterative preview process contributes to a more refined and polished final product.
Once satisfied with the preview, users can proceed to save their refined video by selecting the “Save copy” option conveniently located in the bottom right corner of the screen. This action preserves the original video while creating a new copy that incorporates all the applied edits.
This approach ensures that users maintain a version of the unaltered video while having the flexibility to share or showcase the refined version without affecting the original footage.
Key Features and Highlights
| Real-time Preview▾ |
| • The Play button in the preview window enables users to experience a real-time preview of the edited video, allowing for a comprehensive assessment of the applied changes. |
| Quality Check▾ |
| • The preview functionality serves as a quality check, empowering users to identify any issues or areas that may need further refinement before saving the final version. |
| Iterative Editing▾ |
| • Users can make iterative edits based on the preview, refining the video until it aligns perfectly with their creative vision. |
| Convenient Save Copy Option▾ |
| • The "Save copy" option is strategically placed in the bottom right corner, providing users with a quick and convenient way to preserve the refined version of their video. |
| Preservation of Original▾ |
| • Saving a copy ensures that the original video remains intact, allowing users to experiment with edits without the risk of losing the initial footage. |
| Flexibility in Sharing▾ |
| • Users have the flexibility to share or showcase the refined version of their video while retaining the option to revert to the original if needed. |
| User-Friendly Interface▾ |
| • The intuitive placement of buttons and options contributes to a user-friendly interface, streamlining the process of previewing and saving the edited video. |
In summary, the Preview and Save functionality in Google Photos offers users a crucial step in the editing process. The real-time preview allows for a thorough assessment, ensuring that the refined video aligns with the user’s creative vision.
The convenient “Save copy” option and the preservation of the original footage provide flexibility and peace of mind throughout the editing journey.
Witness the Transformation
To showcase the transformative capabilities of Audio Magic Eraser, here’s a glimpse of a video before and after applying adjustments:
Before Editing:
After Adjusting Wind and Noise Settings:
While the edit may be a bit rough in places, the significant improvement in audio clarity, especially in scenarios like a mail train ride, makes it a small price to pay for the ease of cleaning up your video’s audio.
Conclusion
Congratulations! You’ve now mastered the art of using Google Pixel 8’s Audio Magic Eraser. Say goodbye to unwanted background noise and hello to crystal-clear audio in your videos.
Whether you’re capturing precious moments or creating content, this feature adds a touch of magic to your Pixel 8 experience.
Embrace the power of AI and elevate your video storytelling with Audio Magic Eraser.
Your thoughts are welcome. Feel free to leave any comments below.


